Battleplan Supply Guide: Hubs, Depots and Open Routes
Understand Battleplan supply hubs and depots, diagnose a formation's supply deficit and keep an advancing army connected to its logistics.
Why can a division run out of supply near friendly ground?
A formation can consume supplies faster than it receives them even before it is completely surrounded. Each company tracks supply representing ammunition, fuel and food. Movement and fighting increase consumption; distance and difficult terrain along the depot-to-headquarters route reduce transfer. Inspect delivery and demand together rather than relying only on map ownership.
The official diary describes penalties when supplies are low, followed by attrition and vulnerability to surrender when they run out. Exact rates vary with the situation; this guide does not invent a universal supply radius or consumption formula.
What is the difference between a hub and a depot?
Hubs are fixed sources where supplies enter the battlefield, such as designated ports. Depots are the storage and distribution points you can place and dismantle subject to the mission’s limit. Capturing an enemy hub cuts supply for its original owner; the diary explicitly says it does not start generating supplies for the captor.
| Element | What it does | Practical consequence |
|---|---|---|
| Supply hub | Introduces supplies into the map at a fixed location | Protect the incoming source; it cannot be relocated. |
| Supply depot | Stores and distributes supplies toward units | Position it to support the force you expect to use. |
| Divisional headquarters | Its route from the depot affects the transfer rate | Inspect both route terrain and distance while protecting command. |
| Company | Carries and consumes its own supplies | A division-wide picture can hide an individual unit’s shortage. |
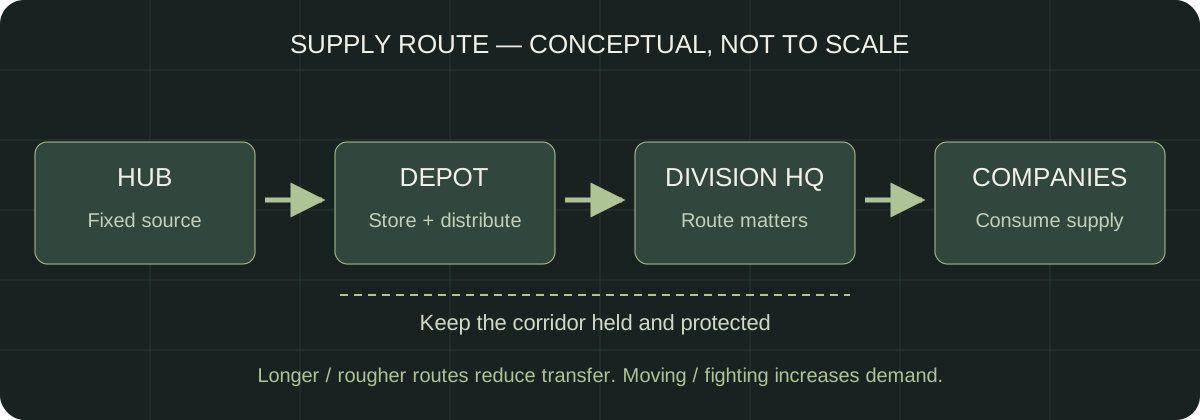
Conceptual supply route, not a game map or an exact transport formula.
How should you place and move depots?
Plan depot positions during deployment around the likely fighting area and a defensible route. The diary describes instant placement and dismantling during deployment, with establishment and dismantling delays after the battle starts. Check the current mission’s depot allowance; a screenshot showing four depots does not establish a universal four-depot limit.
Before moving a depot, identify who currently depends on it. A shorter route to the divisional headquarters can improve delivery, but a depot pushed beside an exposed frontline may be captured. The Defence diary recommends protecting depots with a strong enough line or a reserve force. Headquarters safety also matters; see officers and command.
What should you inspect when supplies keep falling?
Follow the shortage from the affected unit back through its formation and depot. Check whether the force is fighting or moving continuously, whether the headquarters has a long or rough supply path, and whether enemy action has cut the corridor. Decide which cause to address before starting another attack or relocating every depot.
| Observation | Next check | Possible response to evaluate |
|---|---|---|
| Delivery is below consumption | Current movement and combat demand | Pause the advance or regroup where resupply is practical. |
| Headquarters is far from a depot | Route distance and terrain | Consider a safer depot position or a shorter route. |
| Mobile troops have advanced alone | Ground held behind them | Bring infantry forward to secure the corridor. |
| Supply source or depot is threatened | Enemy access and nearby reserves | Protect the route before extending the operation. |
These are diagnostic options derived from the official mechanics, not guaranteed fixes for every mission. Review the task actually executing in the zone order guide if the force keeps advancing beyond the area you meant to support.
Does encirclement immediately empty every unit?
An encircled formation can continue drawing from a depot’s remaining stockpile, but the isolated depot will eventually run down without new supplies. Capturing or locating the depot therefore matters as well as cutting surrounding ground. Use reconnaissance to identify enemy logistics rather than assuming an encircled force must surrender immediately.
The developer’s offensive example pairs armour punching forward with infantry holding the ground behind it. Use that as a planning principle: a breakthrough and a secured route are separate tasks. The combat guide covers preparation and follow-up; the beginner guide provides a broader pre-mission check.
Which sources support the logistics model?
The Supply diary defines hubs, depots, company demand and the headquarters route; the Defence diary adds placement and protection considerations. Their values and example stockpiles predate release, so this guide preserves the documented relationships and omits numerical claims that have not been verified in the current game.
Related Articles
guides
Battleplan Beginner Guide: Prepare Your First Operation
Start Battleplan on Steam with a practical checklist for your army, officers, deployment, orders and supply before your first operation.
guides
Battleplan Combat Guide: Prepare Attacks and Hold Ground
Plan Battleplan attacks and defence around terrain, scouting, artillery, engineers, mixed forces and reserves, using official developer guidance.
guides
Battleplan Zone Orders: Draw, Assign and Adjust a Plan
Use Battleplan Regimental Plans, choose Seize Ground or Balanced Hold, read zone predictions and adjust assignments without overextending.
Was this helpful?
Thanks for the feedback!